Showing posts with label breakouts. Show all posts

Thursday, July 31, 2014

Papaya Seeds

You know those black slimy seeds in the middle of the papaya? Those things you usually scoop out and throw away with a frown on your face because they remind you of fish eggs? Well, next time you cut open a papaya, consider keeping those fish egg-looking seeds and putting them to good use...say, in an awesome face mask...or in a healthy smoothie.


I often will use papaya in face masks as it is a natural exfoliator for skin. This fruit is full of enzymes which are great for the digestive system as well as for brightening your complexion and help improve dull skin. I always wondered, though, as I threw away all those seeds...what if they are just as powerful as the surrounding fruit, and I'm wasting a bunch of a good thing? So I did some research...


It turns out that papaya seeds have incredibly strong antibacterial and anti-inflammatory effects on our digestive system AND on our skin. Hence, this simply, yet incredibly effective, healing face mask...


Papaya Seed Face Mask:

Papaya seeds from one papaya
4 chunks of the papaya fruit
1/4 cup honey
1/4 cup plain yogurt

Directions:

Blend all ingredient in blender until smooth (the papaya seeds will remain a little grainy). Apply to face in circular motions to stimulate circulation. Once your face is covered in the mask, let it dry for 20 minutes. Remove with cool water in circular motions.

Disclaimer: The first time I used a mask with papaya seeds, my face stung a little. It wasn't too bad, but it was enough for me to experiment to make the perfect papaya seed face mask. The yogurt and honey really balance out the potency of the papaya seeds. The yogurt especially is soothing in case you have sensitive skin like me and react to the papaya seeds.

Skin Benefits:

Papaya Seeds: Papaya seeds have intense detoxifying properties. They are also antibacterial and anti-inflammatory. When you rub the ground papaya seeds into your skin, it will give you that extra exfoliating factors to really brighten your skin. When taken internally, papaya seeds can help with liver detoxification, help prevent and treat food poisoning, and is antibacterial and anti-inflammatory in the gut. Studies have also shown evidence that papaya seeds can help treat E coli, Salmonella, Staph and other dangerous bacterial infections. Unfortunately, the seeds are not very tasty, so if you are thinking of using them in a smoothie--beware, the taste might be too much to handle.

Papaya Fruit: The fruit of the papaya contains antioxidants and vitamin A. The papain in papaya is naturally exfoliating and helps to remove dead skin cells. Because of this, papaya also helps fade scars and blemishes, as well as unclog pores and prevent breakouts.

Honey: Raw, unrefined, uncooked honey is one of the most convenient and effective natural ingredients you can use for your skin. Honey is antibacterial and anti-inflammatory. It moisturizes, brightens and softens skin giving it an otherworldly glow. The list of benefits raw honey has on skin is a mile long so I won't list everything here, but, I can tell you that for the past two months I have been washing my face with raw honey every morning and my skin has never looked better. I use raw, uncooked Manuka honey from Trader Joes. Manuka honey has more antibacterial properties than most other honey because it is made by bees who pollinate tea tree flowers. You can get it online here.

Yogurt: For face masks I use regular, Trader Joes Greek Style Plain Yogurt. I don't use non-fat and I don't use European style (it's too runny). Using yogurt with regular fat content is a lot better for your skin than non-fat yogurt. Let me just go ahead and list just some of the ingredients in yogurt that are great for skin: zinc, lactic acid, calcium and B vitamins. Zinc is anti-inflammatory, has mild astringent properties and helps to regulate oil which are all great for acneic or inflamed skin. Lactic acid is a natural exfoliant. It smooths rough skin and helps hydrate skin. It also helps prevent premature aging and discoloration. The calcium helps facilitate cell turnover. B vitamins helps skin to glow.

DIY Simple Cucumber & Aloe Toner & Toning Mist

Simple Cucumber & Aloe Toner

The great thing about this simple and quick recipe is that you can either use it as a toner by pouring it on a cotton ball and sweeping it directly on your face, or you can use it as a toning mist and put it in a spray bottle to use as a quick skin refresher on a hot summer day.


Recipe:

1 cucumber
1 aloe leaf
5 drops of peppermint essential oil or 8 fresh peppermint leaves (optional)

Directions:

In a blender (I use my bullet) blend together one whole cucumber, one aloe vera leaf and the fresh peppermint leaves if you are using them. If you do not own an aloe vera plant, you can substitute this with some 100% aloe vera gel or juice from the store--just make sure it is 100% aloe vera. I always use a leaf because I have copious amounts of aloe--it is (in my opinion) the most useful plant to have handy. 

If you are going to put the whole aloe leaf in the blender, remember to wash the outside skin (same with the cucumber). Or, you can always open up the aloe by cutting the leaf and scooping out the middle. I usually don't do this simply because it's messy and, since I know where my aloe came from, I know the skin is safe. I also use fresh peppermint because I grow that as well. Make sure to wash the leaves so that they are free of dirt.

Once all the ingredients are well-blended, take a funnel, bottle or jar and some cheesecloth or a coffee filter and strain the mixture into the bottle or jar.

Now, if you are planning on using this as a toner, you can bottle it up and put it in the fridge to sweep over your face morning and/or night.

If you are planning on using this recipe as a refreshing face mist, then you will need to let the aloe and cucumber sit in the bottle for about 30-60 minutes, or until the thicker solids settle to the bottom, and then strain it through a cheesecloth or coffee filter again, this time into a spray bottle.

If you only strain the mixture once, chances are it will clog up your spray bottle. (Trust me, I know from experience!)

Once the mixture has been strained you can add 5 drops of peppermint oil (if you want and have not already used fresh peppermint leaves). This will add to the cooling effect of the cucumber and aloe.

Last step is to store your toner in the refrigerator! Keeping it in the fridge will ensure that it is always cool when you want to use it, and it will extend the shelf life of the toner.

This is the ultimate hot summer refreshing toner. The cucumber and aloe are both soothing, hydrating and cooling. The peppermint is cooling and refreshing, and keeping it in the fridge ensures that it will always be nice and cold, providing some relief on one of the 100 degree California (or wherever you are) days.

Skin Benefits:

Cucumber: Cucumbers contain antioxidants, silica, sulfur, ascorbic acid--all which are beneficial for skin. Cucumbers have the ability to fade scars and hyper-pigmentation, reduce swelling, inflammation and redness, sooth a sunburn, tighten pores, refine your complexion, improve skin texture and moisturize all at the same time.

Aloe Vera: Aloe vera, we all know, is moisturizing and sooths irritated skin which is why it's used in all those after-sun and sunburn relief products you see. That's not all it's good for though. Aloe vera also treats acne and is anti-aging. Aloe stimulates cell growth, promotes healing and is a mild antibacterial which makes it great for acne and blemish-prone skin. It's also great for oily skin helping to moisturize without an oily residue. As for it's anti-aging properties, aloe leaves contain a plethora of antioxidants including, beta carotene and vitamins C and E which help improve skin's firmness. Aloe contains tons of nutrients including vitamins, minerals, enzymes, sugars, anthraquinones or phenolic compounds, lignin, saponins, sterols, amino acids and salicylic acid. Crazy right? Have I convinced you to go out and get your own aloe plant yet?

Peppermint and Peppermint EO: Peppermint strengthens skin tissue, banishes oil (great for a hot summer day), and soothes skin. Ever seen a sun burn relief product in the store that is "aloe vera with menthe"? Yep, the menthe is mint. It's an incredible anti-inflammatory which calms the skin and can be used for anything from acne to bug bites. Mint is a natural astringent and source for salicylic acid which prevents pores from clogging and also helps to dry up pimples. You can get the peppermint essential oil brand that I buy here.

Thursday, July 24, 2014

DIY Detox Face and Body Mask

This face mask can be slightly drying but it great for pulling out deep-rooted impurities, getting rid of blackheads, drying out pimples and smoothing your skin. The batch I make is rather large since I usually use this as a whole-body mask. I will slather it on my face, back and chest all at once. You can cut the recipe down a little if you just want to use it for your face.

Ingredients:

3 Tbl Bentonite clay
4 capsules of Activated Charcoal
2 tsp Sandalwood Powder
5 drops of Vetiver essential oil (optional)
5 drop of Sandalwood essential oil (optional)

Directions:

Mix together clay and sandalwood powder. Carefully break open the Activated Charcoal capsules and mix with the clay and sandalwood powder. Slowly stir in water until it has reached your desired consistency. (I make mine pretty thick but if you want it to be a bit more gentle on your skin you can add water so that the mixture is a little thin.) Then add the essential oils and mix in. The essential oils are an added bonus but not a must. Then spread the mixture on your face and let it dry!

For a stronger mask: Substitute water for raw, unfiltered apple cider vinegar. This will double the mask's detoxifying power but be careful! This mask can also really irritate skin and make it more inflamed if you have breakouts.

Side  note: You will feel the mask pulling at your skin as it dries and it may also feel a little itchy. This is completely normal. It is also normal for your skin to be somewhat red and blotchy after you rinse this mask off. Don't worry. It will soon subside. Remember, not all masks are right for everyones skin type. If something doesn't feel right, go with your gut and remove the mask.

Sometimes, for the sake of time, I will quickly whip up a modified version of this mask with just the Bentonite clay and the Activated Charcoal and mix it with some water.

Bentonite Clay: I spoke about Bentonite clay in this post. It is 100% natural calcium bentonite clay and is incredibly detoxifying. It has an amazing ability to pull impurities from the skin. It also increases circulation to the skin. More blood flow means more healing when it comes to blemishes.

Activated Charcoal: This wonder ingredient has the ability to attach itself to dirt and oil in pores which leaves your skin refined and smooth. It's kind of the "it" ingredient in skin care right now but you don't need to buy an expensive face wash with activated charcoal when you can go right to the source--and it's not even expensive!

Sandalwood Powder: Sandalwood has anti-inflammatory, antiseptic and astringent properties making it ideal for people with blemish or acne-prone skin. Sandalwood powder is also great for fading scars. This has long been a highly revered ingredient for skin by people in India. You can find more face masks using sandalwood powder here and here.

Vetiver essential oil: This is one of my favorite essential oils. It's a powerful antiseptic and helps stimulate circulation to the skin and it has long been used to treat all types of skin conditions. I have found that, for me, it is one of the most effective essential oils to use as a spot treatment for breakouts. You can find one resource for all things vetiver oil here.

Sandalwood essential oil: Similar to it's powdered form, sandalwood essential oil is a powerful astringent with toning, antibacterial, anti-inflammatory and anti-aging properties. Unlike it's powdered form, sandalwood essential oil is highly moisturizing. Using it in this mask balances out the drying effect of the sandalwood powder.

Wednesday, July 23, 2014

Delicious Green Almond Smoothie

Hi all! So sorry I've been MIA. I think maybe there is a total of one or two people following my blog, but I still feel SO BAD for neglecting you! Please forgive me. I've been up to my ear lobes in work/school mode. One more semester to go...

This is my breakfast smoothie recipe.


Green Almond Smoothie:


~5 strawberries chopped (depending on how large they are)
1/2 cup unsweetened almond milk (I use the Trader Joes brand)
1 Tbl chia seeds
2-3 Tbl raw, unsalted almond butter (I use Trader Joes almond butter--crunchy or creamy works!)
1 handful of spinach
1 handful of kale
1-2 Tbl raw, unrefined coconut oil (I use Trader Joes)
1 tsp Camu powder (if I have it on hand--I get mine from Sprouts, but you can get the brand I buy here too)
Raw, unsalted almond slices on top (if I have it on hand)


Optional:
for added sweetness: 2 tsp honey
sometimes I will add a little bit of unsweetened coconut milk


Directions:
Blend this all together. I use my bullet because I don't have a blender, so this will make one serving. Often, because of the almond butter and coconut oil, the chia seeds will stick to the sides of the blender. I just scrape them off the sides with a spoon. Once blended, there is usually some room at the top, so I will add more spinach if I can.


Strawberries & Camu: Excellent source of vitamin C for skin and immune health. You can read more about the health benefits of Camu powder here.


Almond milk: I've been trying to cut dairy out when I can for fear that it contributes to my acne. You can read more about almond milk here.


Almond butter & raw almonds: Almonds are so good for your overall health and your skin. They are full of beneficial vitamins, minerals and healthy fats. You can read more about the health benefits of raw almonds and almond butter here.


Spinach: Spinach contains phytonutrients, and are chock full of vitamins and trace minerals. Spinach is a great source of iron and is anti-inflammatory. It can help clear skin of blemishes and rid the body of toxins. You can read more about the health benefits of spinach here.


Kale: Kale is known as a nutritional powerhouse. It is really rick in vitamin K which is a powerful antioxidant. Like spinach, it's high in fiber and is anti-inflammatory. It also contains a high amount of calcium. You can read more about the health benefits of kale here.


Coconut oil: Coconut oil contains fatty acids and is said to help maintain healthy cholesterol levels, increase immunity and also beautify hair and skin. There are tons of articles out there right now on the different and varying health benefits of coconut oil--some debatable. Just always try to buy organic, unrefined coconut oil. You can read more about coconut oil here. Always do your own research!


Chia seeds: My favorite. High in fiber, fatty acids, protein and antioxidants. You can read more about chia seeds here.


Thursday, June 6, 2013

The Kombucha Blast Power Breakfast

This recipe, like the last kombucha recipe I posted, was invented by my father.

If you are not keen on the taste of kombucha, but want to reap its health benefits, then this recipe is definitely for you.

Ingredients:
handful of spinach
3-4 thin slices of cucumber
3-4 slices of banana
2 slices of apple
1 handful of walnut pieces
1 handful of almond slices
1 teaspoon of ground flax seed OR ground chia seeds
1 handful of blueberries
1 handful of blackberries OR raspberries
4 oz of kombucha (whatever flavor you prefer)

Blend all ingredients until liquified and then enjoy!


This recipe is a great, super healthy kick-start to your day. If you have to run off to work in the mornings (like I do!) I would recommend blending all the ingredients together and then pouring it into a water bottle and refridgerating it overnight. Then you can just grab it and go the next day! The nuts and flax/chia seeds provide tons of protein, fiber and fatty acids while the kombucha, spinach and fruit provide wonderful yummy anti-oxidants good for your over-all health (and of course, my biggest concern...your skin!!!!). Yay for getting summer-ready!

I hope you all enjoy this recipe. If you end up doing a different version of this recipe that you like please share it with us all. We always love suggestions.

Wednesday, April 17, 2013

Green Tea

Some time ago The Beauty Gypsy did a post on the many health benefits of green tea.
Today she addressed how green tea can be used topically to help with skin ailments. You can check out her post here.

Green tea to beautify skin? I have lots of that . . . I'm in!

You can find more topical recipes here. And also read about some interesting, and perhaps contradictory (but very practical) information on using green tea topically, here from the Acne Einstein.

I have been breaking out so badly lately and I am definitely going to be trying this. Hopefully it will help my poor, inflamed skin from the rapidly changing (and very unpredictable) weather!

I also came across this pretty interesting post from August Skin. There's a "right" way to wash your face? Who knew?? Perhaps this could also help my current skin woes, let's hope . . .Check it out here.

Happy brewing.


Wednesday, March 20, 2013

the beauty gypsy

Have you all heard of The Beauty Gypsy?

If not, browse her blog--she is amazing and all of her posts are entertaining and filled to the brim with helpful tips and information.

Last week she did this post about how to deal with really huge pimples under the skin. I call them SUBMARINES. And yes, I had to write it in all-caps because that's how you have to say it. Pimples like this are not just submarines. They are SUBMARINES to the max. If you have ever had one, you know what I mean.

Anyways, last week, when The Beauty Gypsy did this post, also happened to be the week that I had a huge submarine on my chin. I barely ever get that type of cystic acne so I didn't know what to do. Needless to say, I panicked . . . and made it worse.

It wasn't until after I had made it worse that I saw The Beauty Gypsy's post. But after I read what she had to say, I wanted to make sure that if I ever got a pimple like that again, I would be prepared.

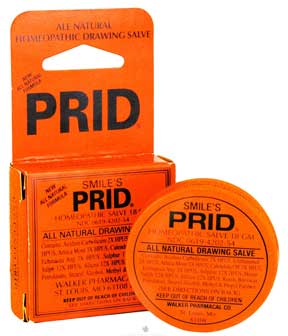
She suggests using Prid Drawing Salve on the stubborn cyst.


The cheapest I found was from WalMart for only $3. That's right . . . only three freakin dollars. Sounds like a bargain to me! The shipping costs more than the actual product. Which is why I ordered two...just to get my shippings worth! You can get a can here.

The Beauty Gypsy told me she uses this stuff all the time--keeping a can at her house, one in her car and one at her office. That was the tipping point for me. I thought this stuff must be close to magic if she relies on it that often and doesn't go anywhere without it!

I am excited to get my can in the mail. I will keep you updated and let you know how well it works for me. If you try it for yourself let me know how it works for you too! I'm curious to see how results will vary for different people.

On another note, I did something that I probably shouldn't have.


I bought these babies.
What do you think???!???! (seriously, what do you think...)
I really really like them. I know it's not everyones style, but I just love chunky boots.

It always scares me to buy things online. I hope that I like them in person as much as I do in pictures.

I'll let you know what I think when I get them!

Link for where I ordered them from here.

I have a lot of packages coming in the mail to look forward to! I'll keep you all updated.

Wednesday, March 13, 2013

bad news

I have bad news. Remember this post?

Well,  I saved up a little, splurged, and tried more MyChelle products . . . and they work.

Why is this bad you ask?

Because no lie, this stuff adds up! And now that I know it works . . . how could I possibly do without it!?

Here is what I got:


The Clear Skin Cleanser which you can find here.

I use this facewash at night before using toner, then the Perfect C Serum, spot treatment, then moisturizer. My intricate and time-consuming routine drives my boyfriend crazy, whoops! But anyways . . . I like this cleanser a lot. My skin is nice and clean afterwards but not dried out and so far I think it has cut down my breakouts--though it is hard to tell which product is doing the most work since I use a serum and a spot treatment too. 

One thing that bothers me: I seriously do not know why they call it "Youth Blemish Control". I would not consider myself "youth" anymore, but I still need blemish control! This is not a cleanser just for teenagers. The other cleanser I like is the White Cranberry Cleanser which you can find here.


Clear Skin Spot Treatment which you can find here.

Once again, this is not just for "youth".

I use this at night and in the morning (as needed). I always put it on after using serum but before moisturizer.

One reason I like this spot treatment is because, not only does it work to heal pimples fast, but also, unlike a lot of other spot treatments, it is quite easy to wear under makeup. Sometimes spot treatments ball up or flake off when you try to apply makeup, and sometimes moisturizer, even after it seems to have dried. If you have used spot treatments before I am sure you know what I am talking about.


Clear Skin Balancing Cream, which can be found here.

Even the people on the MyChelle website who write in reviews say they are "definitely not youth" and they "love" these blemish-controling products.

This moisturizer is an awesome, I mean, awesome, base for makeup. No primer needed. It just has a great matte finish that makes makeup look flawless. It helps control shine/oiliness through the entire day--my skin feels clean all day, not all gunked-up like it usually does by 3pm.

One thing is that you don't get a whole lot of moisture from this "cream". If you have dry skin, this might not be the best product for you. One thing I do to balance this out is I use the Clear Skin Balancing Cream in the morning, but at night I apply a heavier moisturizer. I prefer Neutrogena's Multi-Vitamin Night Cream because it doesn't clog pores but it delivers a lot of moisture. You can find it here. You can also find that night cream in Ulta or at Target.


Apple Brightening Mist, can be found here.

I use this in the morning after I have applied moisturizer, right before I put my makeup on.

Honestly, I could do without this product. I think maybe the Fruit Enzyme Mist, which can be found here, would probably be better suited for my skin. After reading the product reviews for the Apple Brightening Mist, I just really wanted to try it.

It's kind of sticky--too sticky--even after it dries. This is very annoying, which is why I find myself skipping it a lot in the morning just because it is not convenient to apply makeup right after spraying it on my face. It's just so sticky.

I thought maybe I should spray it before I apply moisturizer, but still . . . it just doesn't feel good on my skin. I feel like I have a layer over my face which makes it harder for my skin to breathe. Although that's probably all in my head, there is something to be said for the way a product makes you feel. I do not want to start the day feeling like I have a layer of gunk stuck to my face.


I wish I could work for MyChelle--that would be my dream job! Sadly, that will probably remain in my dreams only, but I would seriously be one of their best and most truthful advocates (-:

I hope you all found this info useful!
Let me know if you try any of these products--I would love to know how well they work for others too.

Thursday, February 21, 2013

beautiful skin and saving the bunnies


A few months ago a Sprouts was built near my house. So of course, I went and browsed their beauty section.

If you don't know what Sprouts is, it's like a huge indoor farmers market--it resembles Whole Foods in the kinds of food it carries, but they are cheaper and have things like homemade "Sprouts" peanutbutter.

They have a huge selection of cruelty-free, all-natural, all-organic products for any and all of your beauty needs. But this is not a post about how awesome (but sometimes over-priced) Sprouts is.
I am posting because it was in Sprouts that I discovered a line of skin care products called MyChelle.
And I am nothing short of AMAZED.

Don't worry if you read this and want to try some of the MyChelle products but don't have a Sprouts near you (I don't know any other stores that carry MyChelle, maybe Whole Foods?)--you can get everything online on their website here, or also search for their products on Amazon.

Basically, all of the products I have tried have been more effective than anything else I have used and all their products are natural. Everything is non-toxic and derived from plants, extracts and plant stem cells AND they use renewable packaging. They are very eco-aware and put their knowledge about the power of nature into their products.

Also, the MyChelle packaging has the "cruelty free" symbol on it, and they say on their website that they are 100% cruelty free which I have been trying to pay more attention to. I have a bunny and it breaks my heart to think that there are bunnies out there being tested on, all for the purpose of human surface beauty. I am not going to go all righteous on you guys, but when you can, which I know isn't realistic all the time, please try to buy cruelty free products. No one can be perfect, but when we are faced with the choice between cruelty free and not, maybe trying our best to get the cruelty free product will help out at least a little.

Lola the bunny


If you want more specific details on MyChelle you can read more about them here.

I encourage you to browse their website. You can chat with a skin care professional, read every single ingredient in a product before you buy it, read customer reviews, and browse helpful articles and skin care tips. Like their products, their website is packed with good stuff and you get a lot out of it.

I have very fair, acne-prone, sensitive skin...not good combos.
This is what I use from MyChelle, though I want to try more!

White Cranberry Cleanser
I use this cleanser every night before I go to bed. This cleanser refines my pores and my skin is so much less oily but it is not dry either, which sometimes I have trouble with. I guess you could say I have combination skin--oily, but at the same time it can be dry and flaky. Yuck. I don't know how good it is at preventing blemishes, which is why I want to try the Clear Skin Cleanser to compare. You can find the White Cranberry Cleanser here. Also, the Clear Skin Cleanser that I want to try but haven't yet, you can find here.


Perfect C Serum

I use this serum every night before I go to bed and I have seen my skin do a 180. It does the most amazing things--most notably, practically rids me completely of acne. Whatever acne I do get is noticably less red and my pimples are much smaller. My skin is smooth, the texture is silky and it looks much brighter. It doesn't smell great, and I would suggest letting it dry for ten minutes before you go to bed, but the results are so so so worth it. I use it ten minutes after I wipe my face with the toner from my DIY beautiful skin toner post. You can find Perfect C Serum here. Also, with this stuff, a little goes a long way.


Clear Skin Serum

Last, but not least, I use the Clear Skin Serum every morning. I use this, then moisturize and then apply my makeup. It has made a huge difference in my skin. My skin produces significantly less oil throughout the day, and yet, at the same time, it is completely hydrated. This serum has detoxifying clay in it that helps to keep your pores from getting clogged and antioxidants to protect it from environmental stressors while simultaneously getting rid of acne. It's awesome, I just cannot say enough about it. You can find it here.

The other products I want to try are the Clear Skin Balancing Cream which moiturizes while also preventing acne, and also the Clear Skin Spot Treatment. Another one that looks enticing is the Apple Brightening Mist.
Clear Skin Spot Treatment
The only downside to MyChelle...now that I have made it all sound so wonderful...is the price.
Be prepared to spend a lot.
Is it worth the money? I can confidently say that it totally is after some consecutive months of usage. But I wanted to make sure it was worth spending the dough on before I told you guys about it.
This is also the reason why I have not tried all of the products that I want to try.
Also, Sprouts does not carry every single product, so some of these I can only get online. Some products you can get for cheaper on Amazon than the on MyChelle site.

Have a wonderful Thursday!

Tuesday, February 12, 2013

Quick Remedies: Breakouts

I will be doing a series of these "quick tips" to remedy different skin issues in a pinch. This week we are talking about breakouts and acne.

If you have any skin "issues" that you want me to talk about, comment below. I will do one on dry skin and also one on enlarged/clogged pores.

Party tonight? Wedding in 48...or maybe worse...24 hours?


I'm not going to lie and say there's a miracle cure, but these tips will definitely help!

Acne:

So you got a sudden breakout right before a big event? This tends to happen when you are stressed out about something. Stress hormones trigger breakouts! So, number one, try to relax. Can't do that? Ok here are some masks that you won't even have to leave your house to do (for risk of going into public with that massive pimple, maybe?). No time going to the store, because, after all, who has that kind of time in a crisis like this?
  • Mask 1:
    • One egg white
    • Ten asprin pills
    • 1 tsp baking soda
      • Whip egg whites together with a fork.
      • Add baking soda and whip in with egg whites.
      • If the asprin pills are coated, then one by one hold each pill under warm water and gently rub between your fingers until you can feel the slimy coating has mostly come off and the gritty asprin underneath is starting to be exposed.
      • Drop each one into the egg white and baking soda mixture and crush with the fork and whip together.
      • If the asprin you are using is uncoated, then hold all ten pills in the palm of your hand and run them under warm water for only about five seconds to start to break them apart so they are easy to mix in with the egg whites and baking soda.
      • Crush/mix/whip asprin in with egg whites and baking soda.
      • Smooth the mixture over you face and let sit for 20-30 mintues, then rinse off.
        • TIP: This mixture is difficult to get off your skin. I suggest using a really mild soap before applying the mask, and then using a more gritty or abrasive face scrub to remove the mask.
        • TIP: Depending on the egg you use, you may have more egg white or less egg white. Adjust the baking soda amount accordingly. Does it seem like you need more? Add a little more. The consistency should be pasty but not thick.
 Why??
Asprin naturally contains salicylic acid which kills pimples. Asprin can also greatly reduce inflammation and redness. It helps to apply asprin to painful pimples.
Egg whites have great healing abilities. They nourish, calm and also tighten the skin, restoring balace to blemishes.
Baking soda gives your skin a deep clean and gently exfoliates which can restore that natural glow to your skin.

    • Mask 2 (A spot treatment, for when you just have that one pesky/sore/inflamed pimple):
      • Three asprin pills
      • Two drops of Tea Tree Oil (OPTIONAL)
      • 1/8 tsp Raw Apple Cider Vinegar (also OPTIONAL...I explain below)
        • If the asprin pills are coated, then one by one hold each pill under warm water and gently rub between your fingers until you can feel the slimy coating has mostly come off and the gritty asprin underneath is starting to be exposed.
        • If the asprin you are using is uncoated, then quickly run each pill under warm water for only about two seconds to start to break them apart so they are easy to crush.
        • Add the raw apple cider vinegar.
        • Add the tea tree oil (optional).
        • Apply paste onto the pimple and leave on for as long as you can.
          • TIP: Sometimes all you have is asprin. Don't have the apple cider vinegar or the tea tree oil? No problem. Just warm the asprin up and crush them with warm water to make a paste and apply that to your pimple.
          • TIP: Don't have tea tree oil, but happen to have lavendar essential oil? Use the lavendar essential oil instead.
          • TIP: If you have a night before the event, sleep with the asprin paste on the pimple.
    Why??
    Asprin naturally contains salicylic acid which kills and dries up pimples. Asprin also greatly reduces redness and inflammation. It also helps if you have a particularly painful pimple.
    Raw Apple Cider Vinegar has great healing properties and also kills bacteria. It contains alpha hydroxy acid which can heal blemishes quickly.
    Tea Tree Oil is anti-bacterial and a great spot treatment used alone as well.
    Lavendar calms and soothes irritated and blemished skin.